Guide for New Allotment Holders
This information is also available as downloadable PDF file Click here to download PDF file or as a Free hardcopy Booklet.
For a Free hardcopy booklet, simply come along to our Membership Table at one of our events, or use our Contact Us page and tell us your request and address for delivery.
Index
1. Harrow in LEAF2. The allotment movement
3. Now you've got your plot
4. Tools
5. What shall I grow?
6. Organic Gardening
7. Good practice
8. It's not all for show
9. Pests and diseases
10. Contact us
11. Other useful contacts
12. Joining Harrow in LEAF
13. Local Horticultural Societies
![]() Harrow in LEAF
Harrow in LEAF
Cultivating an allotment may be hard
work, but the rewards are great – we hope that this booklet will be of some
help to you, and that you enjoy your time on your plot as much as we all do.
If you would like to contact us, or
join our organisation, then just Click here.
![]() The Allotment Movement
The Allotment Movement
The first mention of allotments in
The heydays of allotments were the
two World Wars, when 1.4 million plots were in cultivation. The ‘Dig for Victory’ campaign led to an
estimated 1.3 million tonnes of food being produced on these plots.
Since then usage has decreased, and
by 1996 there were only about 300,000 plots available, but with the current
interest in a healthy lifestyle, concerns about food miles, and worries about
what goes into and onto our food, there has been an upsurge in interest in
‘growing your own’, so that now there are waiting lists for plots all over the
country.
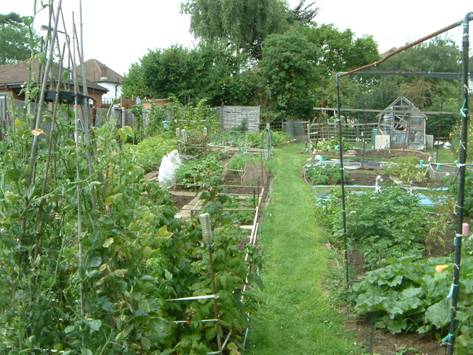
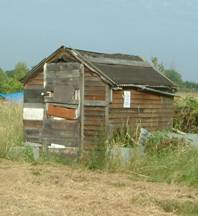
![]() Now you’ve got your plot
Now you’ve got your plot
The
recognised measurement for a plot is described as ‘10 poles’, which is 252 sq
m, or 2716 sq ft. However, your plot
might be 5 poles (a half plot), or a variety of other sizes. The size and position of your plot should be
defined before you sign your tenancy agreement and it is essential that you go
and look at it before you take it on.
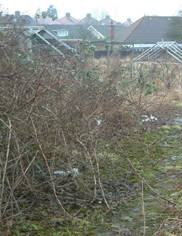
Some allotment authorities will plough or rotovate your allotment patch
(for a fee) prior to leasing it to you, but this isn’t always the case. You may find that your dream allotment starts
out as an overgrown patch of weeds and brambles, with old broken tools, bits of
wood and string hidden under clumps of couch grass.
Here
are some tips to start you off.
Layout. It will help you to go around your allotment site and see how others
have their plots laid out. Some favour
beds, others rows, and some have their own ideas! But it pays to talk to others and find out
why they chose their methods and to decide from this what method of growing is
most suitable to you.
Those
less able to bend may find raised beds useful.
The width of beds should be considered too, as anything over 4 ft (1.2
m) will have you stretching to reach the middle. Also, by keeping the width down to 4 ft, you
avoid walking on the soil and reduce the need to dig.
Will
you have paths between sections? Will
they be wide enough for your wheelbarrow?
Will you plant crops such as dwarf trees, soft fruit, rhubarb and
asparagus that will need to be put in a permanent position?
At
least one good vegetable-growing book is essential (see page 8), but it is well
worth getting to know your neighbours as they often have a wealth of knowledge and will certainly be able to
tell you how not to do it if nothing else!
Clearing. It is tempting to go all-at-it
and attempt to clear the whole of your plot before getting to work, but it’s
worth remembering that weeds will quickly grow on bare earth and by the time
you get to the end of your plot the first bit will be an abundance of greenery,
needing to be cleared all over again.
Work a small section at a time and you should be able to start growing
crops straight away, giving you the motivation to continue with the hard work.
Once
you have an idea of your layout you might have to start by clearing brambles
and rubbish. Do this carefully, as it is not uncommon to find
broken glass from old cold-frames amongst the rubbish left by the previous
tenant. A
large pair of shears, a billhook or a strimmer should be good tools to get the
job done. Invasive plants such as
bramble or bindweed should be burned or disposed of. Some species can grow back from as little as
an inch of root so it is advisable to take out all traces as soon as you find
them.
Once
the area is clear, a good, strong spade and fork are needed to get you started.
You could use cardboard, or weed-suppressing membrane, which you can get from
your local horticultural suppliers, to cover a patch of ground you won’t be
working straight away, to keep the weeds down while you start on the rest. If you don’t mind using chemicals on your
plot you can buy a weedkiller containing glyphosate to clear the ground.
Whichever
your preferred method, when tackling a plot that has not been worked for some
time, you will inevitably have to dig, and dig, and dig some more. It can be
back-breaking work, but doesn’t need to be.
If you haven’t done much digging in the last 6 months you will need to
work yourself in slowly. Don’t be
tempted to turn over large, heavy clods. Instead lift only a small amount and
dig over using a fork to avoid cutting up invasive roots into smaller pieces.
As you
feel tired, stop, and set about some other work, clearing or tidying, then come
back the next day and do a bit more. You
will gradually attain the strength in your back and arms to do more and more
work and will be less likely to do yourself an injury.
Rotovators
can be used, but beware as they can chop up roots and spread unwanted weeds,
increasing the problem. Digging out the
long root-strings with a fork would be a far more effective way to remove them. Also, rotovators will only work effectively
in certain types of soil, and will have varying results depending on the
moisture content.
Once
you have got out most of the weeds you can add manure, home-made compost or compostable material, then you can begin to sow before clearing the
next section of ground. If you choose to cut off the turf before working the
soil, don’t dump it. Turn the sods grass
side down and make a pile. With time this will turn into valuable soil for use
later.
From this............................................to this
![]() Tools
Tools
A spade and fork are essential items to get you going. The smooth stainless steel ones are
preferable to the rough-surfaced or painted type: they slide through the soil
more easily and less clay sticks to them.
Try to get ones with a handle length to suit your height, as this will
considerably reduce the pressure on your back.
A metal-tined rake will break down the soil and prepare the beds for sowing.
A sharp hoe will enable you to keep the ground between rows of precious
vegetable seedlings free of competing weeds.
There are various designs, but choose one which suits you.
A trowel or hand fork is essential for planting and transplanting
seedlings.
You may need shears to keep your path edges tidy, and a good pair of secateurs will be needed if you are
planning to grow soft fruit that will need pruning.
Keeping your tools under cover will
extend their life, and regular sharpening and cleaning will make them easier to
use.
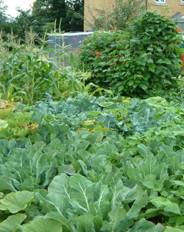
![]() What shall I grow?
What shall I grow?
Grow what you enjoy eating, things
that are easy (eg beans, potatoes, beetroot, Swiss chard, cabbages, salads,
tomatoes, courgettes), that taste better from your garden (most things, but
especially tomatoes, carrots, salads), that are only at their best when really
fresh (peas, sweetcorn, beans, soft fruit, salads, broccoli), that are
expensive to buy from the shops (asparagus, soft fruit). Maincrop potatoes are good to grow, but if
you only have a half plot you may not have enough space. Whatever you grow, you can choose varieties
for flavour rather than the commercially important yield, appearance and shelf
life. Potatoes are said to help clear
the ground (because you dig to plant them, then you earth them up, then you dig
again to harvest them). You may like to
grow flowers too, including ones that will attract insect pollinators as well
as hoverflies, ladybirds and ground beetles that eat pests.
Planning
your crops. When you first get your plot and
have cleared a bit of ground, you will just want to grow something to get started,
but soon you will need to plan where to plant things. Don’t put in perennial
plants such as soft fruit, rhubarb, or asparagus until you have got the ground
more or less free of weeds—it’s very difficult to get perennial weeds like
couch grass, thistles and bindweed out of these crops. You will also need to
think about crop rotation, to avoid following one crop with another that might
suffer from the same pests and diseases or that will use the same nutrients in
the soil. It also allows you to group
together crops that will benefit from manure or garden compost dug into the
soil.
|
Year 1 |
Year 2 |
Year 3 |
|
No manure |
Add manure |
Add manure |
|
Roots |
Brassica
family |
Others |
|
Potatoes,
carrots, beetroot, parsnips |
Cabbages,
broccoli, Brussels sprouts, kale, cauliflowers, swedes, turnips |
Beans,
peas, tomatoes, salads, onions, leeks, sweetcorn, spinach, peppers,
courgettes, marrows, pumpkins and squashes, |
An example
of a 3-year crop rotation; year 4 as year 1
Traditionally crops were divided
into 3 or 4 groups, so that one type of crop did not return to the same place
until 3 or 4 years later. However, these
groupings may not fit in with your choice of what to grow, as many popular
crops are in the ‘Other crops’ group, and will reduce flexibility in your planning—the
important thing is to try not to grow a crop or a closely related one in the
same place each year.
Growing
from seed is
the cheapest way for many vegetables and may be the only way for more unusual
types. It will also give you a far wider choice of varieties. Some types of seed, for example tomatoes,
leeks and cabbages, will remain viable for many years if stored carefully in a
cool dry place, whereas others, notably parsnips, will not. However, if you only need a few plants or
want to get a head start when you first take on your plot, you can buy young
plants. They are available from garden
centres, but allotment trading huts often sell them very cheaply, and
Gluts and
successional sowing Try to avoid too many gluts; plan so you always have fresh
things to eat rather than a huge excess that you then have to freeze or give
away. Don’t plant too many of one
thing—2 courgette plants and 20 runner bean plants might be plenty. Many things can be sown successionally—sow a
metre row of lettuces, then another when you see them germinate. Sow some French beans in mid/late April, then
some more in June—these will be at their peak as the others are declining. Carrots and beetroot can also be sown in
succession to provide young tender roots over a long period. However, many winter crops, such as cabbages,
leeks and parsnips, can be harvested from your plot over many months from a
single sowing.
Catch
cropping involves
growing rapidly maturing crops, often salads, before or after the main crop,
filling space that would otherwise remain empty, for example, before beans,
tomatoes or courgettes are planted out in late May. The salads will be harvested before the next
crop gets too big. Starting off catch
crop plants in pots extends the possibilities.
Careful planning enables you to use your whole plot all year. For example, broad beans and early potatoes
may be harvested in early July and can be followed by cabbages or other crops
sown earlier and transplanted into the space as soon as it is available.
Intercropping can mean either using
low-growing plants between taller plants, as in the combination of sweetcorn,
French beans and squashes, or growing rapidly maturing crops between slower
ones. For example, early salad crops can
be grown between rows of peas, parsnips or Brussels sprouts, to be harvested
before these have grown too large.
It is a good idea to buy a basic
simple book, such as The Vegetable Expert or The Fruit Expert, by D G Hessayon,
both of which are inexpensive and have information on such things as when to
plant and how far apart. Your local
library will have good books on the subject and there are several useful
websites. You can also ask advice from fellow plotholders, who are usually very
willing to help.
Although you should grow what you
like to eat, every year try something new, maybe a few of something you thought
you didn’t like—you may be pleasantly surprised.
Warning--you will soon run out of
space!
.... Protect
your crops.
![]() Organic Gardening
Organic Gardening
Many
allotment holders aspire to organic gardening, working with nature to 'grow
your own'. They often achieve this
gradually, compromising initially while establishing a new plot. The two main principles used are feeding the
soil, rather than the plant, and encouraging natural predators to control
pests.
Feeding
the soil with compost, leaf mould and manure also makes use of recycled waste
and avoids the use of chemical fertilisers.
Using barriers, deterrents and crop companions to reduce pests, weeds
and diseases replaces the need for herbicides and pesticides.
Organic
gardeners do not use artificial chemicals because they can kill pollinating
insects like bees and pest predators in the food chain. Some partly organic gardeners use organic
pesticides and fungicides sparingly.
They are short lived, but may harm some useful insects.
Feeding the soil naturally
●
Add compost and manure - recycle all your organic waste.
If you do not make enough when you take on a new allotment then you need
to buy it.
●
Mulch - but only when the soil is already wet. Use materials such as compost, grass
clippings, leaf mould, rotted muck, straw, or wood chips (6 months old), but
not peat.
●
Grow comfrey - use its stems and leaves as a mulch around tomatoes and bush fruit,
or to make potassium-rich fertiliser. Never use on acid loving plants. Comfrey (or nettle) leaves may also be rotted
down in water to make a liquid feed.
●
Grow green manures (fast-growing grasses/legumes) - cut them before they flower and dig
into the ground or use as a mulch. Green
manures are often grown to protect bare soil in winter and as ground cover to
deter weeds.
Feeding
the soil naturally in this sustainable way also saves money. Rotating most crops is strongly recommended
to maintain the soil quality and deter pests.
Natural
pest, weed and disease prevention
●
Remove and burn - all diseased material before it spreads.
●
Remove and destroy - all heavily pest-infected leaves and vegetables. Pick off single pests and egg clusters from
leaves and destroy.
●
Use physical barriers - net fruit trees, soft fruit and brassicas to deter birds. Cover
plants with horticultural fleece or fine mesh to divert flying insects, and use
collars round the base of brassicas to avoid damage by cabbage root fly. Place barriers around
carrots or grow them in raised beds; both need to be at least 60 cm high to
prevent damage by carrot root fly. Cover with cloches but care must be taken to
ensure regular watering.
●
Remove weeds physically - to avoid the need for herbicides. But be aware that a small piece of
a weed’s roots may grow. Use a fork and
pull the whole root out as a spade may chop the root into small
pieces. The roots of perennial weeds
should be rotted in a container of water before they are added to a compost
heap.
●
Choose plants carefully - to match the type of soil on the plot so that they will grow to be
strong and healthy. Use resistant
varieties where they are available.
●
Diversify - Grow some flowers or let some crops and herbs flower. Grow plants
that encourage friendly creatures and their larvae (eg bees, hoverflies,
lacewings, ladybirds and beetles).
●
Clear the soil in autumn - leave it bare for a few weeks to allow the birds to eat soil pests,
their eggs and larvae. Use the frost to break up a recently dug bed that
contains large amounts of clay.
Otherwise cover the soil before winter to keep off the heavy rains and
preserve its structure. (Cover with
mulches, green manures, cardboard or black polythene and grow early onions and
broad beans.)
●
Try these out – they might
work!
●
Plant tomatoes to clear couch
grass.
●
Plant African marigolds to
clear bindweed, ground elder and horsetail.
●
Plant nasturtiums to lure
aphids away from beans.
●
Plant French beans among
brassicas to deter cabbage root and leaf pests.
●
Interplant carrots with
marigolds, chives or two rows of onions to deter carrot root fly.
![]() Good
Practice
Good
Practice
When you were given the tenancy of
your plot, you should have received a copy of the council’s allotment
rules. Courtesy to fellow plotholders
and neighbouring householders is central to most of these rules:
- Only hand-held hoses may be used, not sprinklers.
- Keep bonfires to a minimum, and only use to
dispose of diseased material and pernicious weeds – try to compost
instead.
- Keep the weeds down to avoid them spreading to
neighbouring plots.
- Don’t bring anything onto the site that you
aren’t going to use, and do keep your plot tidy and safe.
- Keep the paths between the plots trimmed and
clear.
Recycling is part of
the allotment ethos, and you may find that all those odds and ends and pieces
of timber that were lying around when you took over your plot could be used as
stakes, to build raised beds or a compost heap, or to
support netting.
….
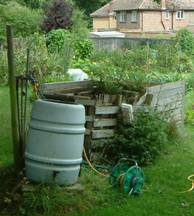
Recycling to build your compost heap and shed.
Composting Almost the first thing to do on
taking over a plot is to start a compost heap – the end product is a marvellous
soil improver or mulch and will save you a good deal of money. You can do without a bin – just make a heap
and cover it over with cardboard or polythene.
However, a square wooden bin is easy to make and manage. Ideally make
two bins side by side: one will be rotting down while you fill the other. The bins should be built directly on to the
soil surface. Hammer in 10 x 10 cm
posts, or anything strong enough, at the corners of an area approximately 1 m
square, and then nail planks on three sides, leaving no gaps. The front can be planks that can be slotted
in to allow easy access to your compost, and the heap should have a lid or
cover to retain heat and prevent it becoming too wet.
The different materials should be
added in layers, and an occasional sprinkling of soil will introduce bacteria
to get the process going. If you fill
the bin in one go, cover it and leave it; it will build up a great deal of heat
and break down quite quickly. Adding
little bits at a time will produce a cooler heap, which takes longer to rot
down. Turning the heap after about three
months will introduce air and help the rotting process. When your compost is brown, crumbly and
sweet-smelling, probably after 6–12 months, it will be ready to use, but don’t
worry if it’s not perfect – just sift out any large pieces of unrotted material
and use them to start the next heap.
To make good compost, add
- most of the plant material from your allotment
- fast composting waste, such as soft growth and
young annual weeds
- things which take longer to rot, such as
cardboard, twiggy and older plant material
- uncooked vegetable peelings and newspaper from
home
- wood ash.
Don’t add
- diseased material and perennial weeds such as couch grass and bindweed –
if they fail to compost completely you may just end up spreading them
around. These can be left to dry and
burned instead, or the weeds can be rotted in water to make a nutritious
feed
- cooked food
Leaves can be added to your compost
bin, left to rot separately in a simple container made from chicken wire and
stakes, or put into a bin bag punched with holes. This makes leaf mould in a year or two - a
wonderful ingredient for potting composts.
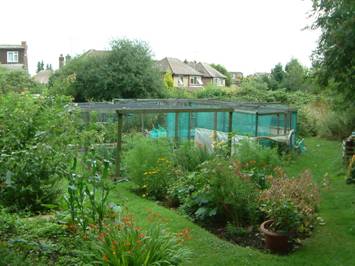
![]() It’s
not all for show
It’s
not all for show
As you get more proficient you might
like to think about entering a local show.
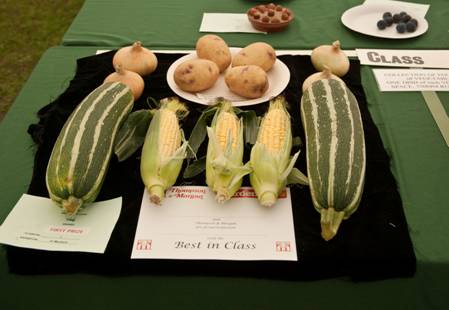
....This could be your award next
year.
![]() Pests
& Diseases
Pests
& Diseases
If you were to consider all the
pests, weeds and diseases that can affect your crops you probably wouldn’t
think it worth bothering. Luckily, in
any one season the chances are that you will only come across a few of the vast
array of pests and diseases that are just waiting to declare war on your
delicate little vegetable plants.
Listed below are some of the more
common Pests:
Aphids – These small green or brown insects suck the
sap of the plant with devastating effects.
They deposit a sticky honeydew on which disease spores can stick, so
causing further problems.
Blackbirds – The only time they are
a problem is when soft fruit is ripe.
The most effective way to deter them is to use netting positioned so
that they cannot perch on it and still access the fruit.
Big Bud Mite – This pest is prevalent on
blackcurrants and causes the buds to swell up.
The buds should be removed by hand and burnt. It also transmits the reversion virus, which
reduces crops.
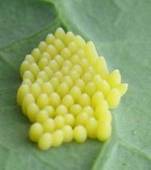 Cabbage White Butterfly
(Large and Small) – The problem is not the
butterfly but the caterpillar, which has a voracious appetite. Check the leaves of cabbages when the butterflies are
about; the off-white or yellow eggs are usually laid on the lower surface. With
your fingers rub off the eggs and any small larvae which may have hatched. Covering the target plants with horticultural
fleece or fine netting should prevent the butterflies laying their eggs in the
first place. Netting should be held away
from the leaves, otherwise the butterflies may reach them.
Cabbage White Butterfly
(Large and Small) – The problem is not the
butterfly but the caterpillar, which has a voracious appetite. Check the leaves of cabbages when the butterflies are
about; the off-white or yellow eggs are usually laid on the lower surface. With
your fingers rub off the eggs and any small larvae which may have hatched. Covering the target plants with horticultural
fleece or fine netting should prevent the butterflies laying their eggs in the
first place. Netting should be held away
from the leaves, otherwise the butterflies may reach them.
Cabbage white butterfly eggs
Carrot Root Fly – The creamy-yellow larval stage of the carrot fly is very
destructive, first burrowing around the outside and eventually tunnelling
throughout the root. Parsnips, celery
and parsley can also be attacked. The female flies lay their eggs in the soil
beside the host plants. These hatch
about seven days later.
These
insects are low fliers, rarely going above 50 cm, so the plants can be
surrounded with a polythene barrier about 60 cm high, or covered with garden
fleece. Lifting the crop in autumn
limits the damage. Sow the seed very
thinly to reduce thinning as they are attracted by the smell of the crushed
plant, and sowings in late summer or in early spring for harvesting in the
summer should be at lower risk.
Cutworms, Leatherjackets, Chafer Grubs, Wireworms, Millipedes – All of these
pests attack the roots of plants below the ground. They are more commonly found
in newly cultivated ground. Once the
soil is in regular use, they will be brought to the surface by hoeing and the
birds will gladly finish them off for you.
Pea Moth – This is a common pest of
peas but is only a problem between June and August. The adult lays its eggs when the peas come
into flower and the grubs then feed inside the forming pods.
 Slugs and Snails – There are 29 species in
Slugs tend not to cross anything
made of copper, therefore a continuous barrier of copper around vulnerable
plants should keep them out. When
hunting for slugs use a half-and-half mixture of vinegar and water in a hand
sprayer; one squirt should kill them.
Whitefly – These small white flies can
be a real problem. They are particularly
fond of brassicas in the open. They congregate on the underside of the leaves
and deposit a sticky honeydew, on which sooty mould can grow. When the leaf is touched they take off in a
mass, only to land on another nearby plant.
Wood Pigeon – Wood pigeons are a pest to the gardener as they can
devastate brassica crops. Protect
vulnerable crops with netting, but use a fine mesh to prevent the butterflies
from laying their eggs.
.............and now for the Diseases:
Blossom End Rot – This causes the bottom of tomatoes to turn black. It is a
physiological disorder related to calcium deficiency. Regular and even watering helps to prevent
the problem.
Club Root –
This devastating disease affects brassicas, swedes, and wallflowers. It is
caused by a soil-borne fungus that causes the roots to thicken and
distort. It is much worse on badly
drained and acid soil. It survives in the soil indefinitely and can be
transmitted via the soil stuck to your boots to other areas of the plot.
Parsnip Canker
– This disease causes brown marks around the neck of the root. Use only resistant varieties.
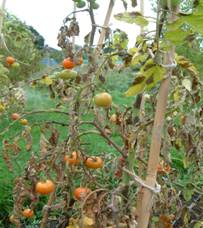 Potato and Tomato Blight – This first shows as black or brown blotches on the leaves or stems. In
more severe cases the plants turn yellow and eventually die. The potato tubers can be saved in the early
stages if the top growth is cut to the ground, removed, and burned, though the
tubers may be small. Tomato fruit will become brown and inedible; infected fruit
and plants must be destroyed.
Potato and Tomato Blight – This first shows as black or brown blotches on the leaves or stems. In
more severe cases the plants turn yellow and eventually die. The potato tubers can be saved in the early
stages if the top growth is cut to the ground, removed, and burned, though the
tubers may be small. Tomato fruit will become brown and inedible; infected fruit
and plants must be destroyed.
….Tomato blight can devastate your crop.
Reversion –
This virus disease, which is found mostly on blackcurrants, causes a change in
leaf shape and the leaf buds to become red. It is spread by the big bud mite
and once infected, the plants slowly get worse.
There is no cure and affected plants should be dug up and burned.
Strawberry Mildew – This is a common disease of strawberries and causes dark patches to
appear on the upper surface of the leaves with a silvery grey mould on the
underside. The fruit can also be
affected. Spray with a fungicide at the
beginning of flowering until the fruit starts to colour. Remove and burn all foliage after harvesting.
White Rot (onions) – This shows as a mouldy growth near the neck of the onion, which then
rots. Remove bulbs and do not put into
store. Spraying with a fungicide may
help if caught early enough.
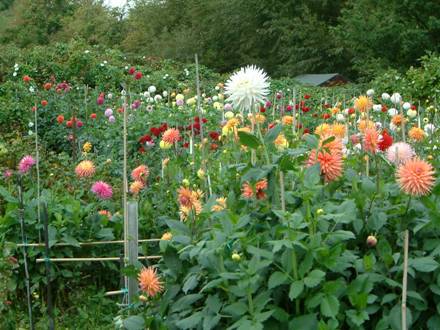 ….You can grow some flowers as well as vegetables on your
plot.
….You can grow some flowers as well as vegetables on your
plot.
![]() Contact Us
Contact Us
Website: harrowinleaf.org.uk – This
is packed full of information about allotments and other horticultural matters.
Email: info@harrowinleaf.org.uk
Telephone: 07968 417367
![]() Other
Useful Contacts
Other
Useful Contacts
Most allotment sites in the borough
have a representative to the local council or to
Council
Services Harrow Council provide and maintain the boundary fences and gates, the
main central path on the site and water pipes and taps. They will cut the main areas of grass, but
not the paths between plots.
The council’s central switchboard
number is 020 8863 5611
![]() Joining
Joining
If you would like to join Harrow in
LEAF and support us in our work to promote and improve allotments and
horticulture in the borough, please cut off the slip below and return it with
your remittance in the sum of £2, (correct at time of going to press), made
payable to Harrow in LEAF, to The Membership Secretary, 35 Eastcote Road, Pinner, Middx HA5 1EL.
Please include a self addressed envelope to receive membership card by return post.
Name …………………………………………………….
Address ……………………………………………………
……………………………………………………
E-mail ……………………………………………………..
Telephone …………………………………………………
Allotment Site/Plot and/or Society (if applicable)…………………………………………………
![]() Local
Horticultural Societies
Local
Horticultural Societies
There are thriving horticultural
associations on many of the allotment sites.
These are a good source of seeds, fertilisers, netting and all your
other gardening needs at discounted prices.
Many of them also organise outings and talks, and some have their own
annual show. Further details of these
societies, and other local groups with horticultural interests can be found on
the
With trading hut on the
Entrance
Hatch End
Horticultural Society
Chairman: 020 8428 2430
Headstone
Allotments and Gardens Association
With trading hut on the Headstone allotment site
Opposite 125 Pinner View, N. Harrow
Trading hut on the Newton Park West allotment site
r/o
Roxbourne
Horticultural Society
Trading hut on the Yeading Ave Allotments
95/97a
Trading hut on the
Path by the side of
Written and published by
Registered Charity no 1108144